Saturday, October 30, 2010

Playing in the Leaves and Cowboy Cookies

This weekend the kids had a few extra days added onto their weekend. So, we put our heads together to cook up a little fun. The kids got the rakes out while I got the cookie sheets out. Then we called our best friends over for a leaf pile party.


I was going to put milk and cookies on the table...


...while the kids were going to put on a show!


Once we came up with our plan, the kids immediately requested that I make cowboy cookies. A couple of years ago, I found Laura Bush's cowboy cookie recipe. The first time I made them, they were a HUGE hit. How could I possibly let these lovely kids down with some inferior cookie?


This cookie is not for the faint of heart and the board of ingredients looks a little daunting, but believe me when I say, these cookies are worth it.


I use my Kitchen Aid mixer for the first part of these cookies. Put the butter in the bowl and mix it for a few minutes.


Add the white sugar to the bowl and give it a couple of minutes to mix. You want that sugar and butter to really mix well at this point for a good cookie.


Add the brown sugar and give that a few minutes to mix into the butter.


Next in is the eggs. Give them a bit of time to incorporate as well.


And the last wet ingredient is vanilla. Give it just a minute to mix in with the butter and sugar before the dry ingredients go in.


Now it is time to start adding the dry ingredients in. First add all the flour and mix very slowly until all the flour is incorporated. Do not over mix the dough. As soon as everything is incorporated stop mixing.


Add the baking powder, baking soda, salt and cinnamon and just mix until the cinnamon is evenly distributed.


Add the coconut and oatmeal and mix.


At this point, if you are using a Kitchen Aid, remove the beater and take the bowl out of the stand mixer. The bowl is now too full to mix any more ingredients into the dough without spilling. So from here on out, the mixing has to be done the old fashioned way...by wooden spoon!


Add the chocolate. I am using Ghiradelli chocolate chips. 1 1/2 cups of semi sweet chips and 1 1/2 cups bittersweet chips.


Pecans!


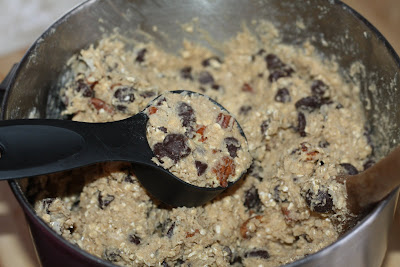
Work out time. Mix the chocolate and pecans into the dough.


I make 1/4 cup dough balls. I fill a 1/4 cup measuring cup and then dig the dough out with a spoon.


On my air bake cookie sheets, I only put five dough balls on at a time. These cookies need plenty of room to spread out while they are baking.


They cook for 18 minutes and they come out slightly soft in the middle, but golden brown along the outside edge. They sit on the cookie sheet for a few minutes until the middle is set. Then I transfer them to a flat surface...not a cooling rack. They cool quickly, but they do need that flat surface to finish setting up.


Ingredients

  • 3 cups all-purpose flour
  • 1 tablespoon. baking powder
  • 1 tablespoon baking soda
  • 1 tablespoon ground cinnamon
  • 1 teaspoon salt
  • 1 1/2 cups (3 sticks) butter, at room temperature
  • 1 1/2 cups granulated sugar
  • 1 1/2 cups packed light-brown sugar
  • 3 eggs
  • 1 tablespoon vanilla
  • 3 cups semisweet chocolate chips
  • 3 cups old-fashioned rolled oats
  • 2 cups sweetened flake coconut
  • 2 cups chopped pecans (8 ounces)

  • Directions

    Prep Time: 25 minutes
    Bake Time: 17 to 20 minutes
    Yield: About 3 dozen cookies (see note below)

    1. Heat oven to 350 F.

    2. Mix flour, baking soda, cinnamon and salt in bowl.

    3. In 8-quart bowl, beat butter on medium speed until smooth and creamy, 1 minute. Gradually beat in sugars; beat to combine, 2 minutes.

    4. Add eggs, one at a time, beating after each. Beat in vanilla.

    5. Stir in flour mixture until just combined. Add chocolate chips, oats, coconut and pecans.

    6. For each cookie, drop 1/4 cup dough onto ungreased baking sheets, spacing 3 inches apart.

    7. Bake in 350 F oven 17 to 29 minutes, until edges are lightly browned; rotate sheets halfway through. Remove cookies from rack to cool.

    Note: For 6 dozen small cookies, use 2 tablespoons dough for each. Bake at 350 F for 15 to 18 minutes.

    Copyright 2000, Laura Bush


    Tuesday, October 26, 2010

    Halloween Party

    This past weekend, we had a rustic Halloween party in our garage. We decided to invite some of our favorite people to come over and spend some time with us. Our plan was to have dinner in the garage and then watch a movie...out in the garage.


    Time is flying by. I am constantly amazed at how fast the kids are growing and maturing. I want to celebrate as many moments with them as I can. Making our time together a little extra special and memorable is so worth it when I see the kids smiling and laughing.


    To get ready for our party, we gave the garage a little make over.


    I am not a huge fan of gory Halloween themes. I much prefer pumpkins and colored leaves. I can handle a few spiders too. I was very conscientious of the fact that we had a group of kids ranging in age from 5 to 16. A wide range of ages is a challenge when you want everyone to have fun and feel like the party had been planned for them.


    But for the kids, a Halloween party is all about the treats and candy.


    To make this a little more fun, I stuck glow sticks into two cheap little vases and filled them with candy corn. We LOVE candy corn and I had to take a picture quickly before all the candy was gone.


    We brought our outdoor tables in from the patio.


    I set the kid friendly tables with scrapbook paper for place mats, a sprinkle of fabric leaves, and fun little napkins that I bought at Wal Mart.


    We made a few decorations out of empty tin cans. My kids filled the cans with water and froze them. When they were rock hard, I used a hammer and nail to punch holes in the cans outlining a pumpkin face. Then I painted the can with a few coats of metallic acrylic paint from the craft store. Then I went back and filled in the face shapes with black metallic paint.


    A few pumpkin spice scented candles and we were in business.


    I served hot dogs, orange jello, cooked carrots, and tater tots for dinner. But who cares about that! Here are our lovely desserts compliments of our dear friends. They brought lovely s'mores bars and a delicious pumpkin cobbler. We LOVE pumpkin anything. I also made some little candy corn cookies.


    After we were stuffed to the gills, we watched a movie. My dear hubby and big strapping sons had brought our two love seats, the DVD player and a TV to the garage out to the garage for the adults to cuddle on during the movie. The kids sat on patio chairs. We watched the movie How To Train Your Dragon.


    Then after the movie the kids turned off all the lights, grabbed the glow sticks and headed outside for some 'running around in the dark' fun. The kids were exhausted by the time they headed to bed, but not to tired to make sure that we knew they thought this should become a new family tradition.


    Entertain Exchange

    Sunday, October 10, 2010

    It's Broke...Now What?

    A long time ago, I started decorating our master bedroom. It was going very well until I stopped. I ran into a few function issues and I did not know how to solve those little problems. So finally I just decided to start shopping for an end table. I needed something black and I wanted something slightly funky. I needed it to be small and I also wanted to use it as an organizer for hubby's charging station in a chic sort of way. I had narrowed my search down to two end tables in my price range at CSN when I found something in our garage that had been left here when we moved in.


    It was in terrible shape. The back was warping and had separated from the sides, the paint was completely gone in spots and about half of the little knobs that covered up the screw holes were missing. On top of that, the knobs had been painted a metallic gold color so it was very ugly.


    I had looked at this piece of furniture for ages until a light bulb went off in my Mon's head. She suggested a few changes and suddenly I had a great idea! I had been looking for something with clean lines for our bedroom and I also wanted something that would be able to organize the mess of charging lines hubby and I use for our cell phones and IPOD's. For a few hours worth of work with supplies I already had, I figured that perhaps I could make this ugly duckling into something. So, I went to work gathering a few tools up.


    I dug the little gold knobs out with a screwdriver.


    Then I sanded the whole piece. I rubbed it down with a damp cloth and hauled it back inside. I filled the screw holes in with wood filler.


    This is a multi-step process. I filled the little whole with wood filler and let it dry. Then I sanded the spot with fine grit sandpaper. You may need to add even more filler to the hole after you sand. The object is to make the hole disappear.


    While the filler dried, I removed the hinges from the door and the cabinet and reattached the back of the piece with the nails that were already in place. Then I gave everything a coat of black paint. I did not prime it, but if you were going to use this in a high traffic area or if the piece will be taking lots of abuse from little ones or frequent use, then I would definitely prime it first.


    While the first coat of paint dried, I ran up to my local hardware store with the original hing in my purse. I wanted something a little different. But I soon found out that this was an OLD hinge and the distance from screw hole to screw hole was something that I was not going to find anymore. So, I took myself over to the paint section and found a bottle of silver spray paint that would match my brushed nickle knob that I already had at home from another project.


    After a couple of light coats, I was super happy with the result. So fast forward another coat of paint on the door and table, putting the door back on with the original hardware that had been painted...don't forget to paint the screws...and you wind up with this:


    I'll show you how I turned this into our charging organizer in a later post.

    I am very excited with my refinished piece. I am using this post to introduce a new category to my blog, "It's Broke...Now What?" I find great pleasure in re-purposing odds and ends, re-finishing them or using a bunch of old stuff to make a new project.